
Theme Blocks
- Overview
- Adding the Product Offer Block
- Adding the Cart Upsell Block
- Adding the Recently Viewed Products Block
- Block Settings
- Variant Display
- Recently Viewed Products & Analytics
- Multiple Block Instances
- Switching Themes
- Troubleshooting
Overview
The app uses Shopify Theme App Blocks to render offer widgets on your storefront. Theme blocks must be manually added to your theme via the Theme Editor before any offers will appear to customers.
There are three blocks:
| Block | Purpose | Supported Templates |
|---|---|---|
| Product Offer | Renders Bundle and Popup offers | Product page (product.json) |
| Cart Upsell | Renders Cart Upsell offers | Cart page (cart.json) |
| Recently Viewed Products | Shows products the customer recently browsed | Product, Collection, Homepage, Page |
Important: Even if your offers are set to Active, they will not appear on your storefront until the corresponding theme block is installed.
Adding the Product Offer Block
The Product Offer block displays Bundle and Popup offers on your product pages.
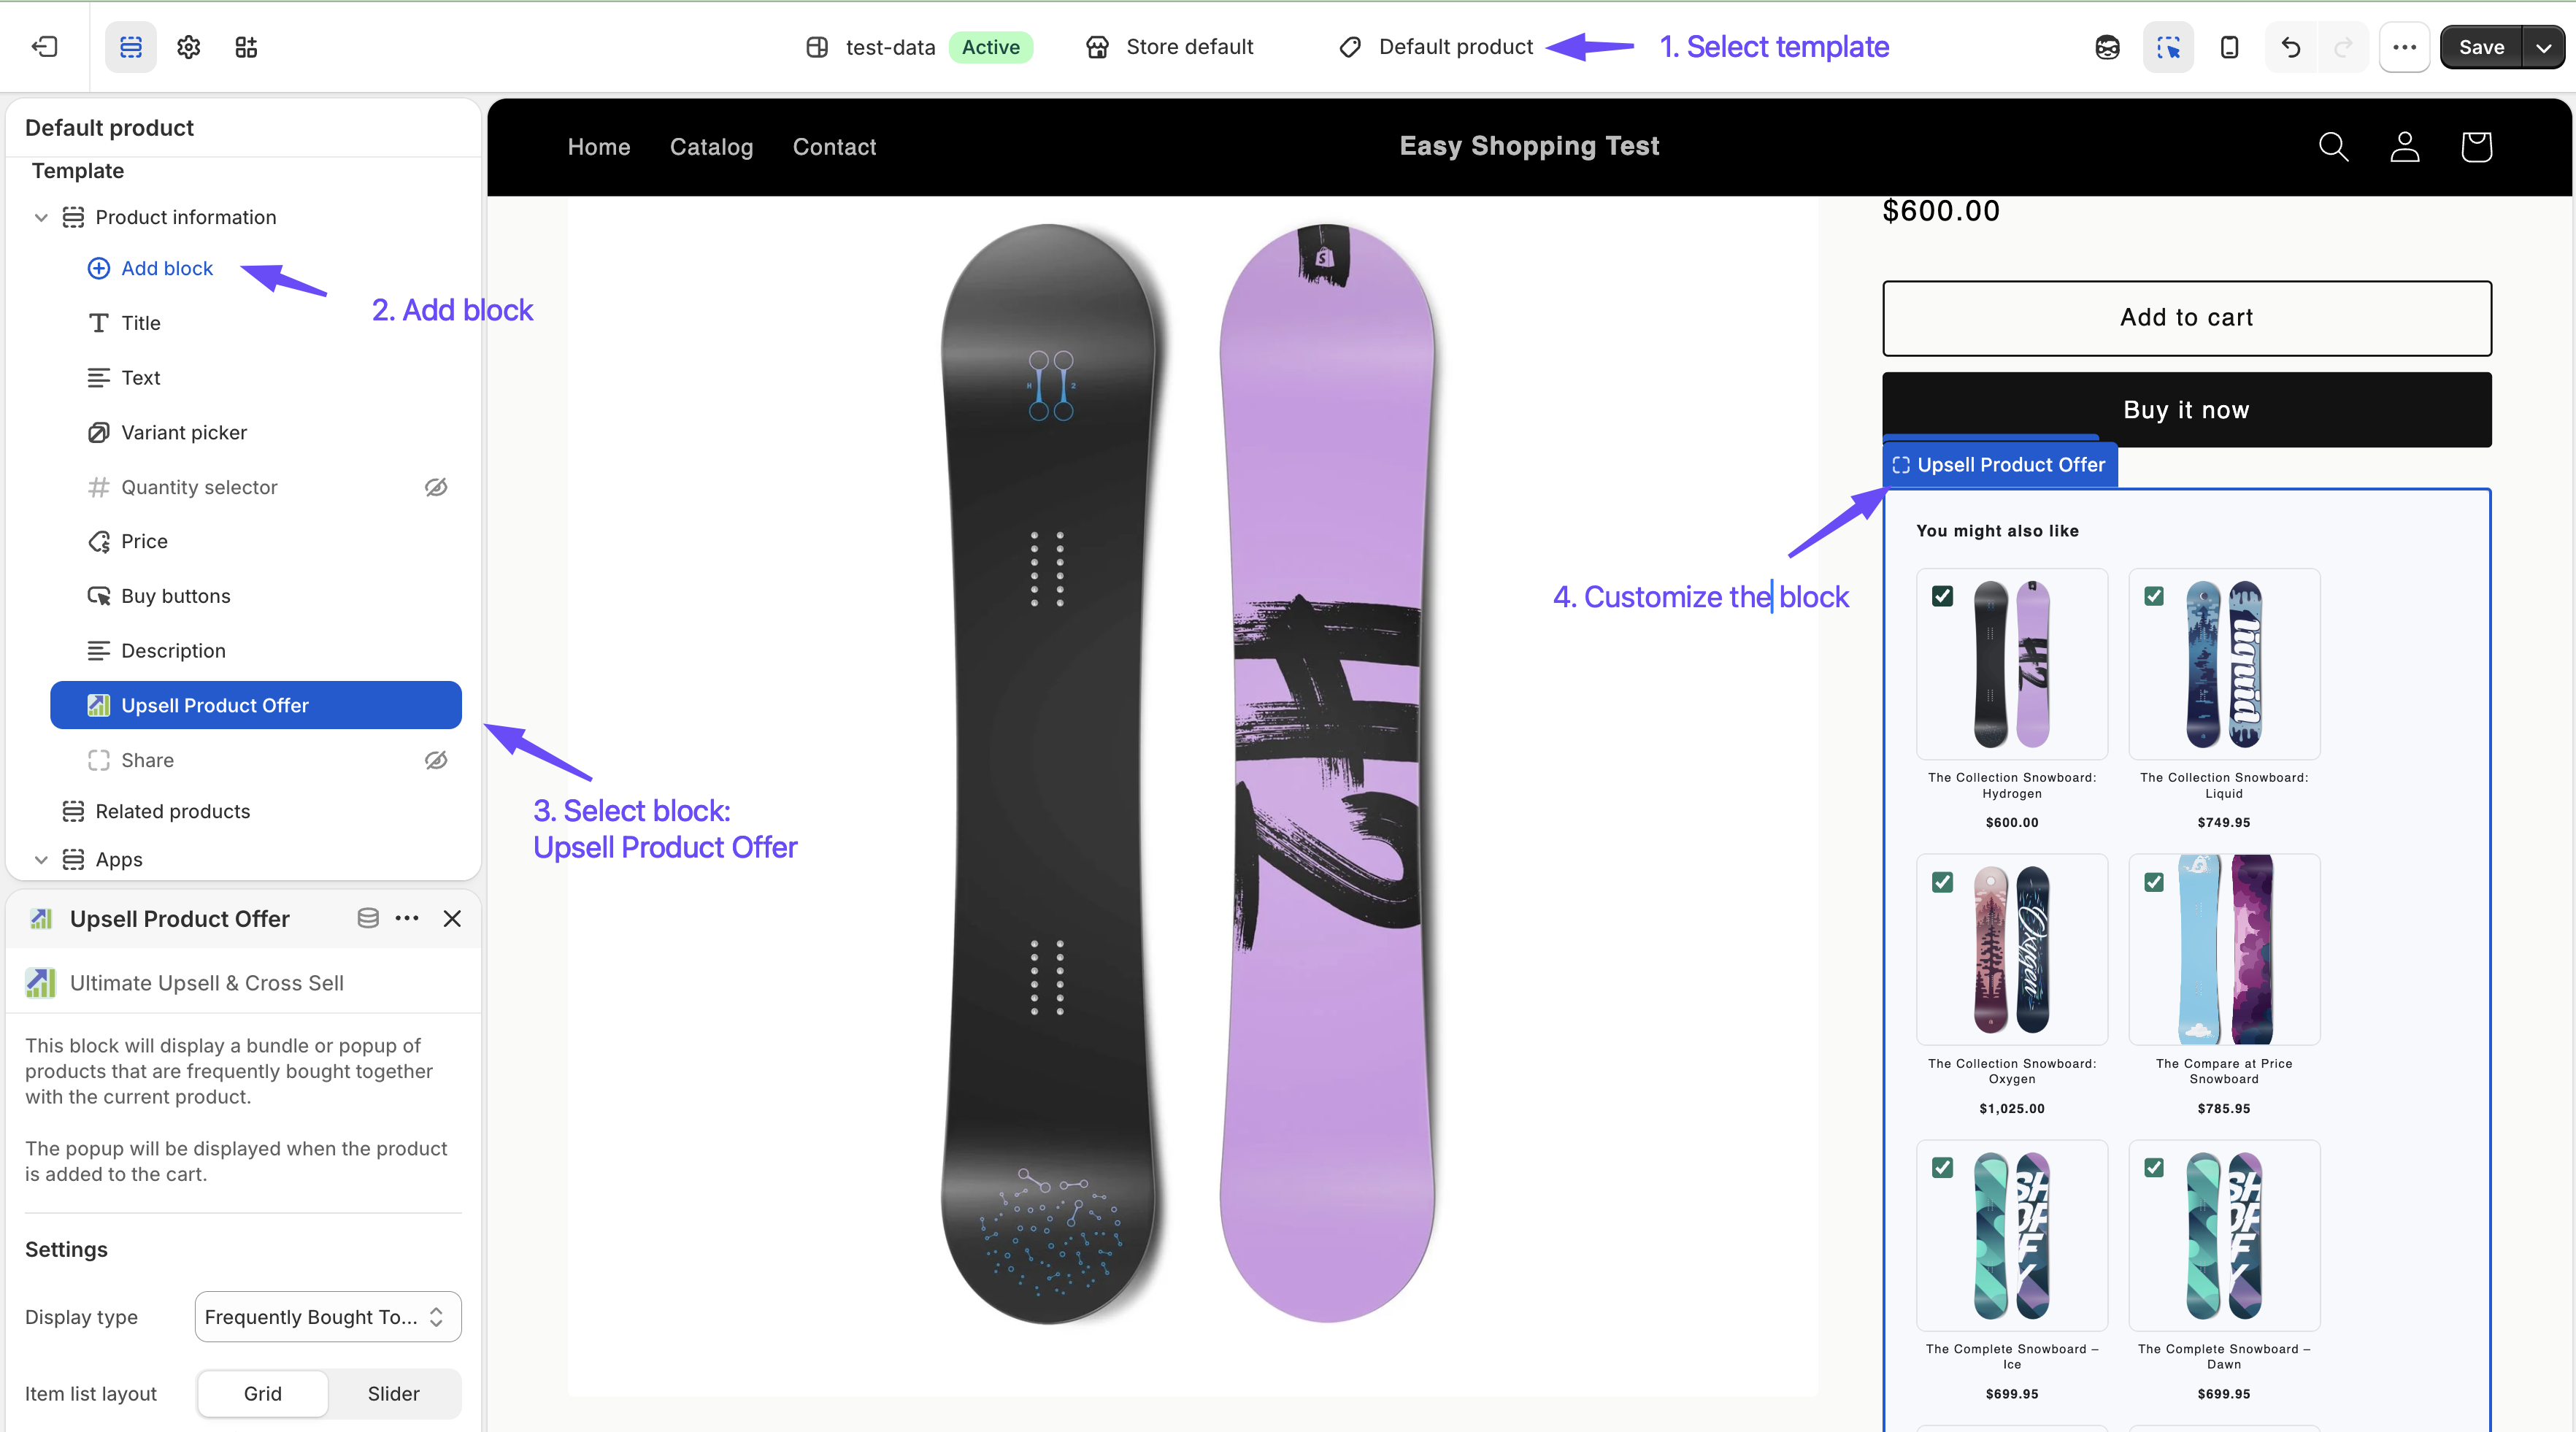
Steps
- From your Shopify admin, go to Online Store → Themes.
- Next to your active theme, click Customize.
- In the top center dropdown, select Products → Default product (or whichever template your products use).
- In the left sidebar, click Add section or Add block (depending on your theme structure).
- Search for “Ultimate Upsell” or scroll to find Product Offer under the app blocks section.
- Click the block to add it and position it where you want offers to appear (e.g., below the product description or add-to-cart button).
- Click Save.
Tip: The Dashboard detects whether this block is installed. If missing, a banner will appear with a direct link to the Theme Editor.
Adding the Cart Upsell Block
The Cart Upsell block displays Cart Upsell offers on your cart page.
Steps
- From your Shopify admin, go to Online Store → Themes.
- Next to your active theme, click Customize.
- In the top center dropdown, select Cart (or the template that shows your cart page).
- In the left sidebar, click Add section or Add block.
- Search for “Ultimate Upsell” or scroll to find Cart Upsell under the app blocks section.
- Click the block to add it and position it above or below the checkout button.
- Click Save.
Adding the Recently Viewed Products Block
The Recently Viewed Products block shows a personalized list of products the customer has browsed on your store. Products are saved in the browser’s local storage — no login required — and the block re-renders automatically as the history grows.
This block operates independently from your upsell offers and does not require any offer to be configured or active.
Supported templates
Unlike the other two blocks, Recently Viewed Products can be placed on multiple template types:
- Product pages — show other products viewed during the same session
- Collection pages — remind shoppers of products they explored before
- Homepage (
index) — surface recently browsed products for returning visitors - Custom pages (
page) — suitable for dedicated “Your history” or wishlist-style pages
Steps
- From your Shopify admin, go to Online Store → Themes.
- Next to your active theme, click Customize.
- In the top center dropdown, select the template you want to add the block to (e.g., Products → Default product).
- In the left sidebar, click Add section or Add block.
- Search for “Recently Viewed” or scroll to find Recently Viewed Products under the app blocks section.
- Click the block to add it and position it on the page.
- Click Save.
Tip: Adding this block to the Homepage is especially effective for returning visitors — customers who came back to buy will immediately see the products they browsed before.
Block Settings
Once a block is added, you can configure it directly in the Theme Editor. Click the block in the sidebar or on the canvas to see its settings.
Product Offer Block Settings
| Setting | Options | Description |
|---|---|---|
| Display Type | Bundle / Popup | Choose whether to show Bundle or Popup offers from this block instance |
| Item List Layout | Grid / Slider | How recommended products are arranged (Bundle only) |
| Check All Items by Default | Yes / No | Whether all bundle items are pre-checked (Bundle only) |
| Show Plus Icon | Yes / No | Show the “+” separator between bundle item cards (Bundle only) |
| Variant Display | Separated / Grouped by product | How product variants are presented — see Variant Display |
| Block Max Width | 300–1400 px | Maximum width of the offer widget |
| Button Color | Color picker | Background color of the Add to Cart buttons |
Cart Upsell Block Settings
| Setting | Options | Description |
|---|---|---|
| Item List Layout | Grid / Slider | How recommended products are arranged |
| Variant Display | Separated / Grouped by product | How product variants are presented — see Variant Display |
| Block Max Width | 300–1400 px | Maximum width of the offer widget |
| Button Color | Color picker | Background color of the Add to Cart buttons |
Recently Viewed Products Block Settings
| Setting | Options / Range | Default | Description |
|---|---|---|---|
| Heading | Text | “Recently Viewed” | Section heading displayed above the product cards |
| Button text | Text | “Add to cart” | Label for the Add to Cart button on each card |
| Maximum products to show | 2–10 | 4 | Cap on how many recently viewed products are displayed; older entries are dropped once the limit is reached |
| Layout | Grid / Slider | Grid | Grid shows all cards in a responsive grid; Slider shows them in a horizontally scrollable carousel |
| Block max width | 300–1400 px | 1200 px | Maximum width of the block container |
| Button color | Color picker | #008060 | Background color of the Add to Cart buttons |
Variant Display
The Variant Display setting controls how product variants appear inside offer widgets. It is available on both the Product Offer and Cart Upsell blocks.
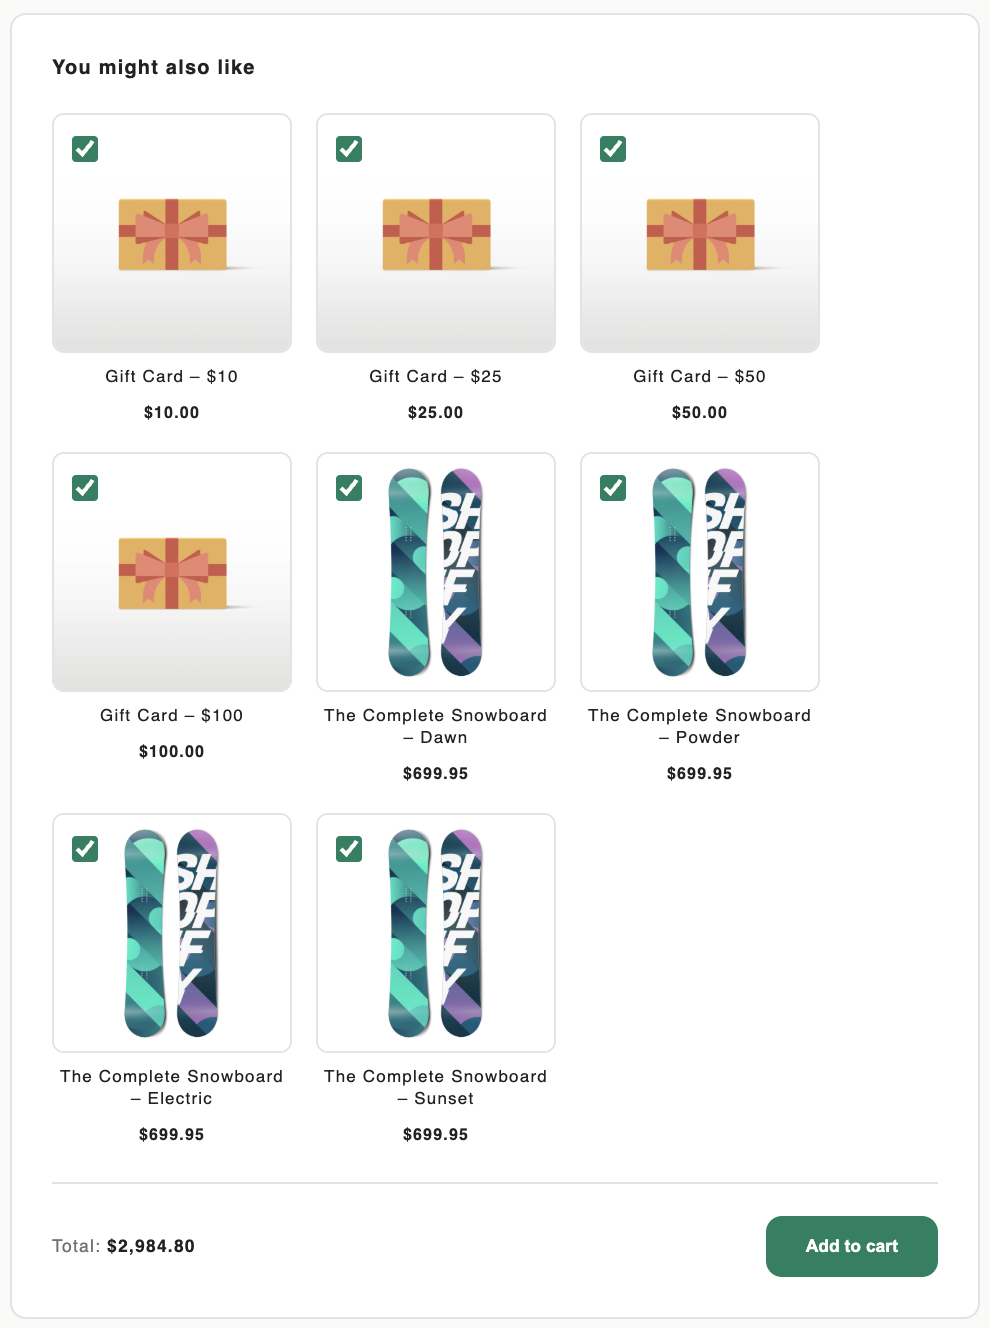
Separated items (default)
Each variant is shown as its own individual card.
- A product with 3 variants (e.g., Small, Medium, Large) appears as 3 separate cards, one for each variant.
- The customer clicks the card they want and adds it directly — no dropdown required.
- Best suited for offers where you have carefully curated which specific variants to recommend.
Grouped by product
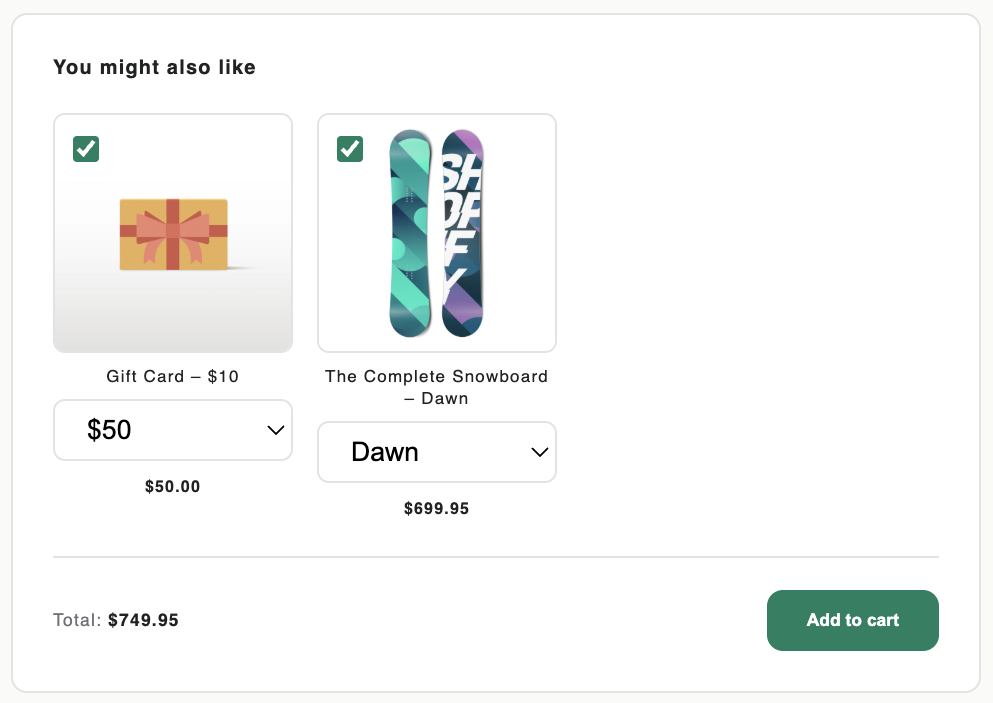
All variants of the same product are merged into a single card with a variant dropdown selector.
- A product with 3 variants appears as 1 card with a
<select>dropdown listing all available variants. - When the customer changes the dropdown, the displayed price updates automatically to reflect the selected variant’s price (including any active discount).
- The first available variant is pre-selected by default.
- Best suited for offers where customers should be able to choose their preferred size, color, or style.
When to use each mode
| Scenario | Recommended Mode |
|---|---|
| Recommending specific variants (e.g., only “Black L”) | Separated |
| Recommending a product and letting customers pick their size/color | Grouped by product |
| Offer contains many variants and card grid looks cluttered | Grouped by product |
| Offer contains carefully selected single variants | Separated |
Note: The Grouped mode respects variant availability. Unavailable variants are shown in the dropdown with “(Unavailable)” appended and cannot be added to the cart.
| Separated Items mode | Grouped by Product mode |
|---|---|
 |
 |
Recently Viewed Products & Analytics
The Recently Viewed Products block tracks its own impressions, clicks, and conversions separately from your upsell offers. You can view its performance in the Recently Viewed Block Analytics section at the bottom of the Analytics page.
- Impression — recorded each time the block renders with at least one product card
- Click — recorded when a customer clicks “Add to cart” on a recently viewed product
- Conversion — recorded via the
orders/paidwebhook when a purchased line item contains the_upsell_block: RECENTLY_VIEWEDproperty
Revenue from Recently Viewed conversions does count toward your billing cycle revenue limit, the same as offer conversions.
Multiple Block Instances
You can add multiple instances of the same block to a template. For example, you could add two Product Offer blocks — one for Bundles (above the description) and one for Popups (at the bottom of the page).
Each block instance will independently query for offers matching its configured display type.
Switching Themes
If you switch to a different theme, you will need to re-add the app blocks to the new theme. The Dashboard will detect that blocks are missing and show a banner with links to the Theme Editor.
Troubleshooting
Offers are not showing on my storefront
Check the following:
- The correct theme block is installed on the relevant template.
- At least one offer is set to Active.
- The offer’s trigger conditions match the current page (e.g., a “Specific Products” offer will only show on the trigger product’s page).
- Your billing cycle revenue has not reached the plan limit. See Billing Plans.
- The global offer disable switch is not enabled in Settings.
The block shows but no products appear
- For Manual recommendations, ensure products are selected and available in your store.
- For AI recommendations, ensure there are products in your store with matching tags or collections.
- Check that the recommended products are published and available for sale.